- Customers
- Customer View
- Subscriptions
- Invoices
- Payments
- Manual Payments
- Live Payments
- Payment Methods
- Customer Contacts
- Customer Notes
- Batches
- Early Admin
- Early Invoice
- Early Batches
- Adjustments
- eMandate
Documentation
Getting Started
Manage
Batches
To simplify your collection of payments and save you money, Bill Again supports the processing of multiple Payments as a Batch. What this implies is that instead of processing individual Payments from Customers one by one, you can bundle and process up to five hundred payments as a single transaction.
Bill Again will automatically bundle Payments of the same Currency, Type, Action Date and Gateway together which will be processed as one transaction on their specified date to be processed. Please note that Payments will only be bundled in this manner for Customers who have been set up with a Batch Gateway.
In addition to payments being automatically bundled in a batch, you may also manually add payments to a batch for Customers with a Batch Gateway set up. As with automatic batching, all Payments within a group will have to have the same Currency, Type, Action Date and Gateway. Manual payments may be added to batches created automatically or a newly created batch, keep in mind that the limit for all Batches are 500 payments.
Once the batch has been submitted the payments will be allocated to Customers’ Invoices and listed in their Payments and Credits section. Please note that Batches and the payments contained within them will only be processed once the Batch has been submitted. Submitting a Batch has to be done manually by you as specified below, there is no automatic submission for Batches.
Batch Overview
The Batches overview page can be accessed by selecting Batches from the left hand main menu. This brings the user to a table formatted list of all the Batches currently logged in the system, as shown below:
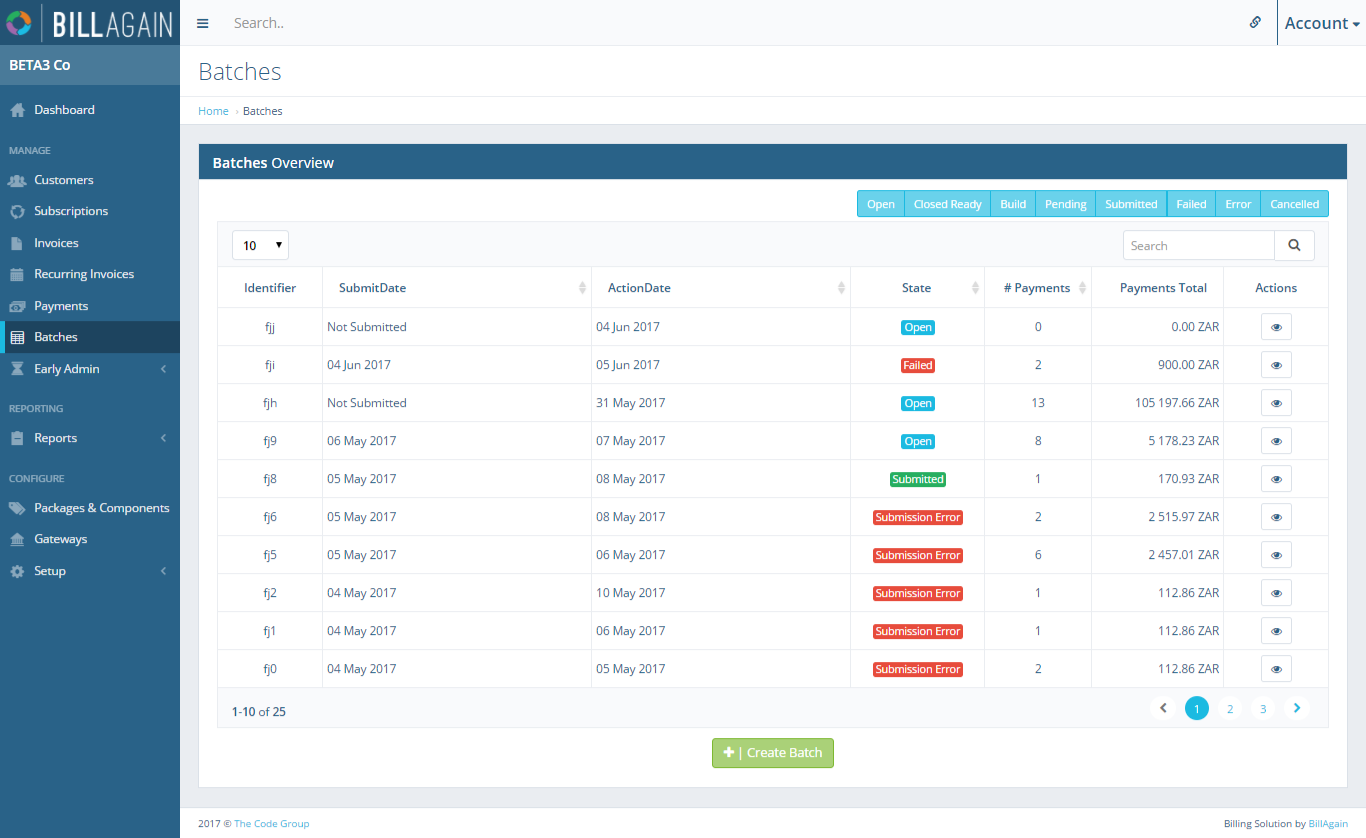
Batches Overview
This screen provides immediate, summary-based information for Batches as well as giving the user the following options for single, specific Batches:
- Viewing a Batch
- Adding a new Batch
The fields on this screen are explained briefly below:
- Batch ID
- Gateway to be used
- Submission date
- Action Date
- State
- Amount of Payments contained
States and Processing
Depending on certain actions and criteria, Batches can be in a range of states, as described below:
- Error: An error occurred while building the Batch, there might be an error with the Batch information or the information of one of the payments
- Cancelled: The batch has been cancelled and will not be submitted
- Open: The Batch is open for additional payments
- Build: The batch has been build
- Pending: The Batch has been built but is pending submission, it cannot be modified at this stage
- Submitted: The batch has been successfully processed and submitted.
- Closed Ready:
Batch payments will remain in a pending state until submitted, when submitted the payments will be assumed successful and not pending anymore until they are picked up to be unsuccessful.
Adding a Batch
Batch payments complying with a Batch's Currency, Type, Action Date and Gateway will automatically be added to the latest Batch created until its limit of 500 payments is reached. Once the latest Batch’s payment limit has been reached, additional payments will either be added to the another existing Batch with the same specifications or a new Batch with these details will automatically be created and added to.
Although Batches are created automatically as payments specified to be in the form of a Batch go off, a Batch can also be manually created. To Create a new Manual Batch, select the Create Batch button at the bottom of the Batches Overview page. This redirect you to the Create Batch on which it will be required to specify the new Batch’s Gateway to be used, Currency, Action Date. You also have the option of adding Notes to the Batch but this purely optional. Once all the details of the Batch have been entered, select the Save button and the Batch will be created and saved.
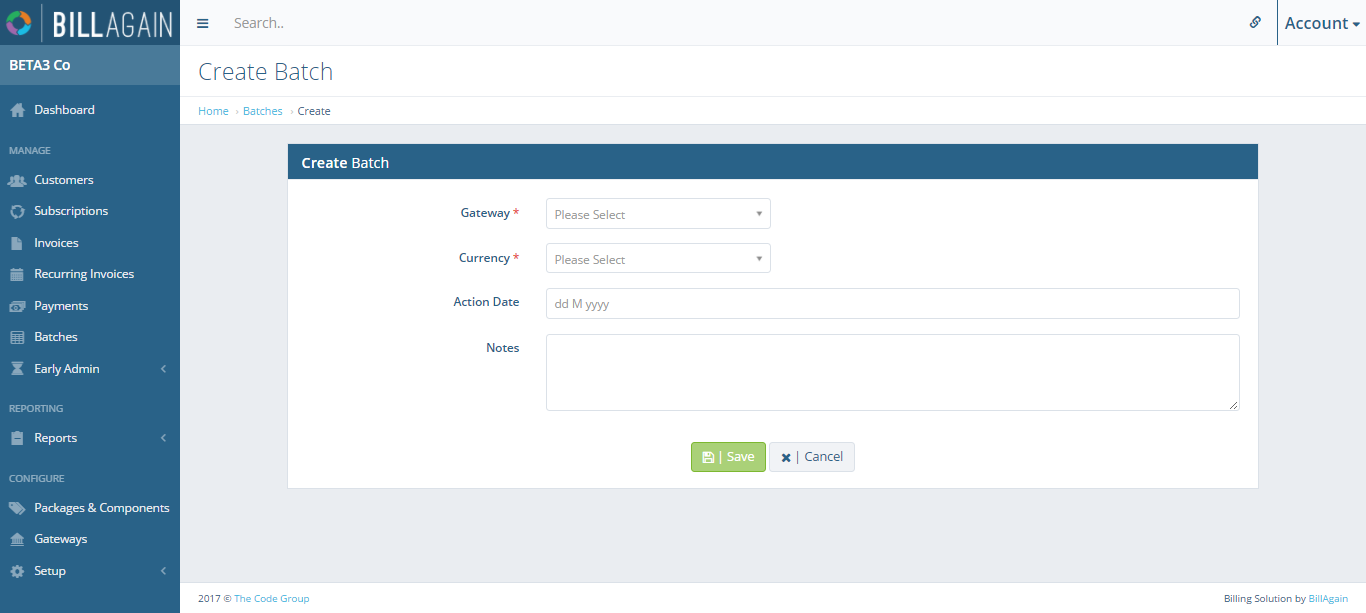
Create Batch
Please note that only Gateways that support batch processing and which you have set up previously will show up as selectable on this page. The same applies for Currencies, which can be set up on their own page. It is also important to note that a Batch’s action date may not be specified to be later than two weeks from the date that it is added.
Viewing a Batch
The Batch view page contains the currently saved details of the batch as well as the payments that form part of the batch. This view page can be reached by selecting the view button next to an existing Batch from the Batch Overview page.
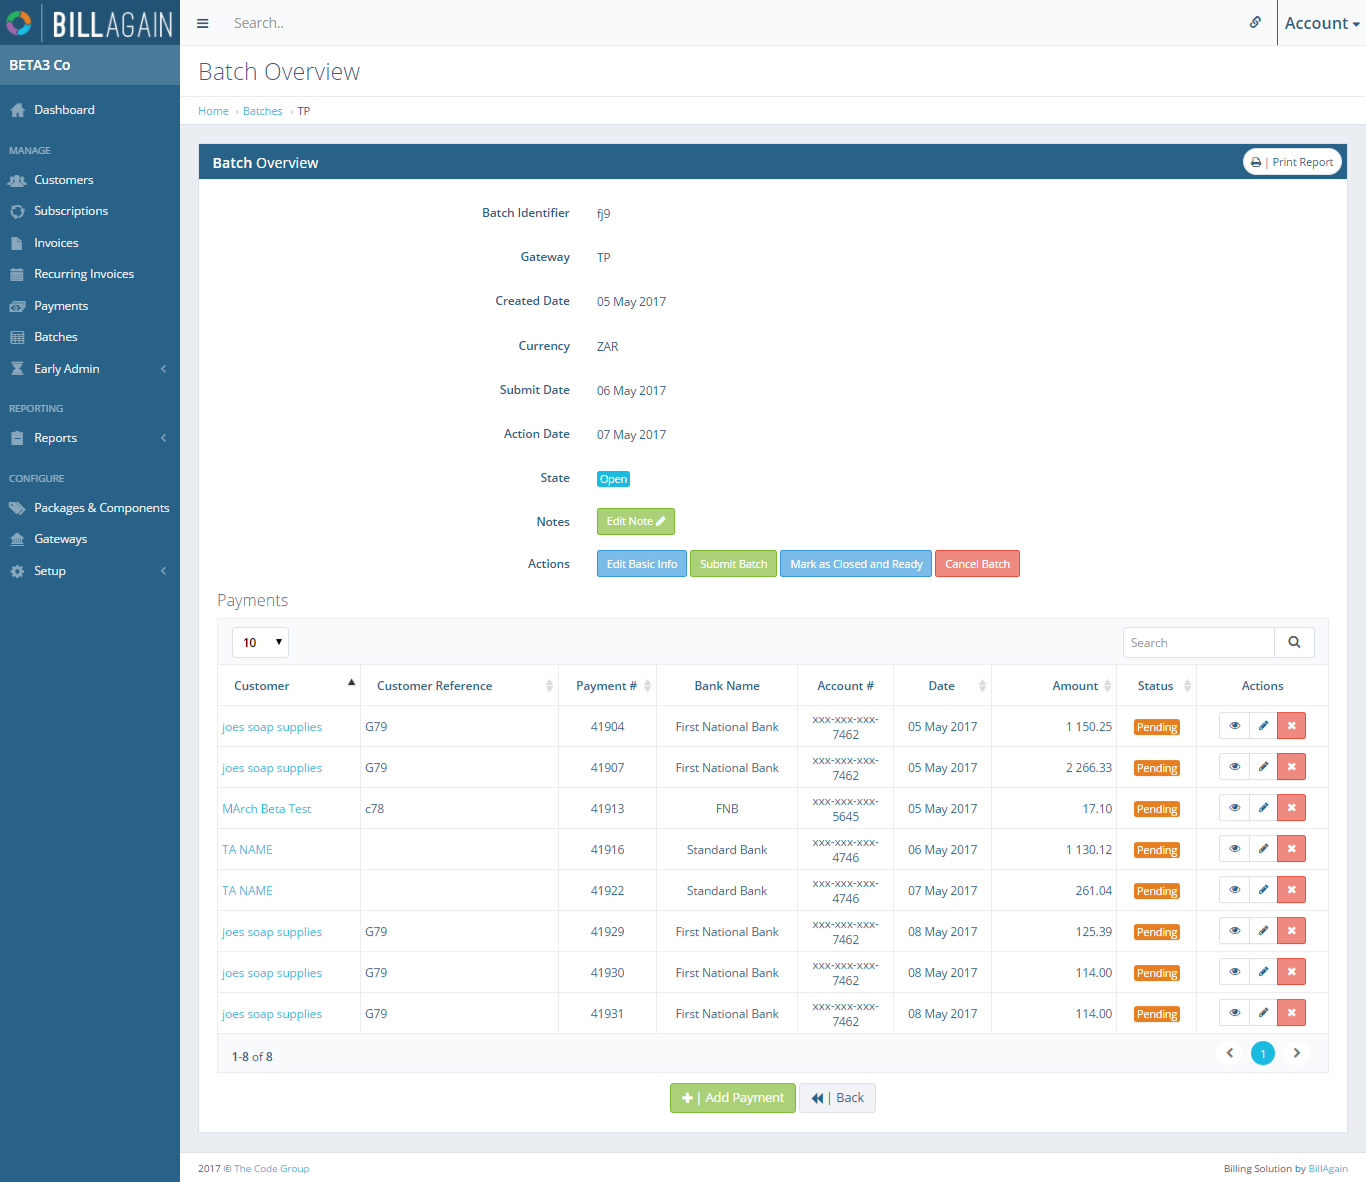
View Batch
In addition to displaying the Batch details and payments, the page also contains the following functionalities:
- Printing a report of the Batch
- Editing the Batch
- Submitting the Batch
- Cancelling the Batch
- Viewing a payment
- Editing a payment
- Deleting a payment
- Adding a payment
Submitting a Batch
When you are satisfied with a Batch’s details and all its payments has been added you can submit it. A Batch cannot be processed before it has been submitted and cannot be submitted automatically, if this method is therefore not used the payments contained in the Batch will never be processed. Once submitted, all the payments contained within it will go off as a single transaction on the Batches' action date.
A Batch can be submitted from the view page of a Batch which is reached by selecting the view button next to an existing Batch from the Batch Overview page. Once on this view page has been reached, select the Submit Batch button above the Payments table. When clicked you will be directed to the Submit Page batch on which are required to enter your Account password, with which you logged in, and optional Notes on the Batch submission. After entering the password, select the Submit Batch button to submit the Batch and process its Payments. Selecting the Cancel button will Cancel the submission operation and return you to the Batch view page.
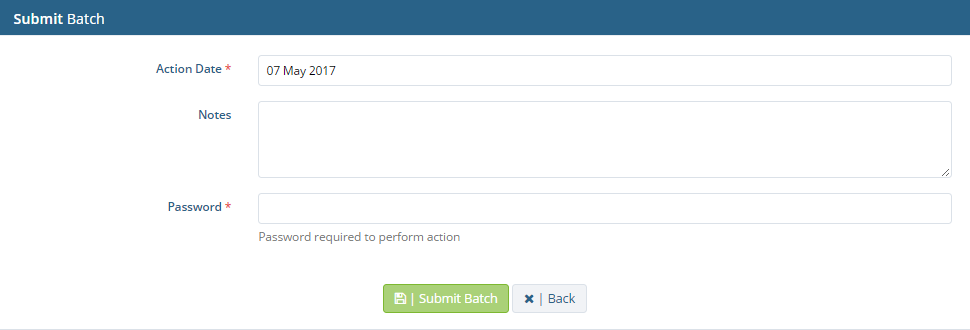
Submit Batch
Please note that Payments linked to a Batch will only be processed once the Batch has been submitted in this manner. While the Batch is waiting to be submitted these Payments will have a pending status and therefore not be allocated to any Invoices or Customer balances.
Editing a batch
To change the details of a Batch before it is submitted, select the Edit Basic Info button above the Payments table on the view page of any Batch. To reach this view page, select the view button next to an existing Batch on the Batch Overview page.
Once this button was clicked, the Edit Batch page will be loaded from which you may change its Submit Date, Action Date and Notes attached to it. Once you are satisfied with the Batch’s new details, select the Save button to save the changes. Alternatively, you can select the Cancel button which will return you to the Batch view page and discard any changes you made to the Batch.
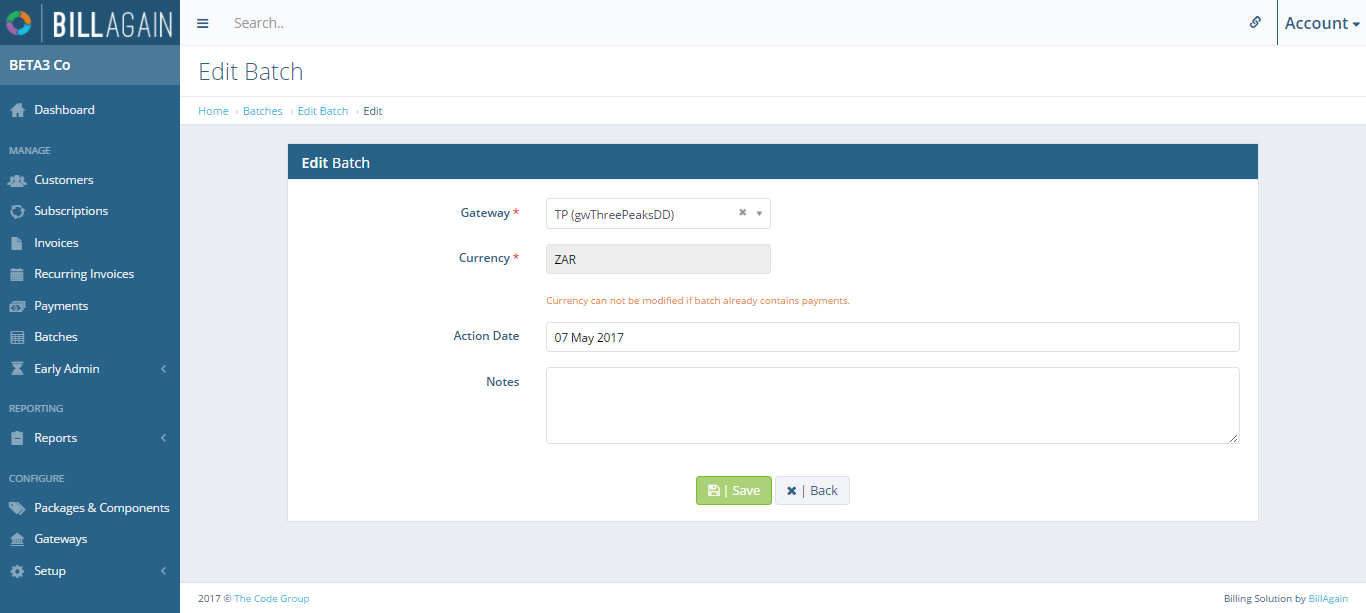
Edit Batch
Payments
As discussed earlier, Payments which comply with a Batch’s Currency, Type, Action Date and Gateway will automatically be added to a Batch until that Batch’s limit of 500 Payments have been reached. It is however also possible to manually add payments to a Batch for a specific Customer.
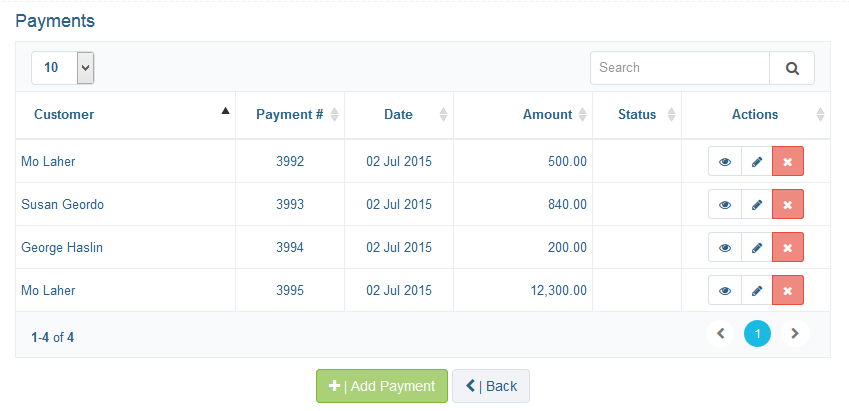
Batch Payments Overview
Adding and maintaining Payments can be done from the view page of the Batch in which they are contained. The view page can be reached by clicking the view button next to an existing Batch on the Batch Overview page.
Please note that only Manual Payments can be edited or deleted, you do not have the option to do so for automatically added Payments. It is also important to note that Payments cannot be modified once the Batch within which they are contained has been submitted
The Payments section can be found at the bottom of this view page and enables the following actions with regards to Payments:
- Add
- View
- Edit
- Delete
To manually add a new Payment to a Batch select the Add Payment button on the view page of an existing Batch. This will load a Add Batch Payment popup, from which you will first be required to select a Customer to which the payment will be added. To do this type the name, or part thereof, of the Customer or Company’s name and select the appropriate one from the results displayed. Once a Customer has been selected, select the payment method registered to the Customer to be used and enter the amount of the Payment.
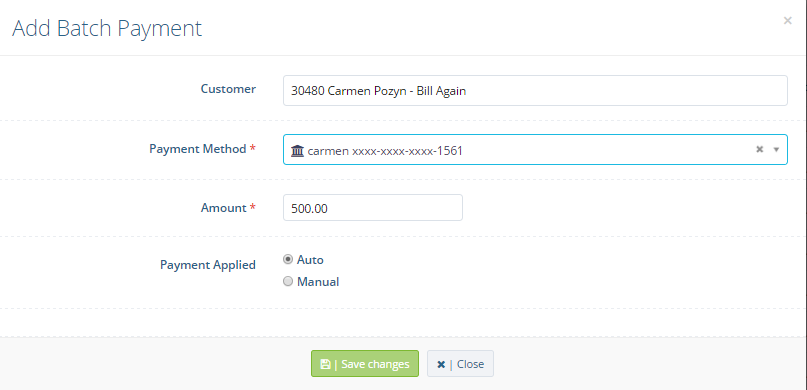
Add Batch Payment
Next you are able to specify whether the Payment will be automatically allocated to Invoices or if you wish to do so manually. If manual allocation is selected, an allocations table will be loaded which will contain all the Invoices to which the Payment can be allocated.
Within this table, Clicking “all” in the last column heading will result in all allocated values to be populated, the values being the amounts outstanding. Ticking the “Allocate Full” checkbox will result in that rows allocated value to be populated with the outstanding amount. The allocated value for the invoice has to be less than or equal to the Invoice balance.
The summary box underneath the allocations table contains three summary values:
- Amount Received: The total amount of the Payment
- Amount Allocated: The total of Invoice allocations
- Remaining: The amount of the payment that can still be allocated, if amount is negative and has a red text colour then then you have over allocated and may not save until this is fixed
Once you are happy with the details of the new payment being added you can save it by clicking the Save button at the bottom of the popup. This will save the Payment to the batch and close the popup. Alternatively, to cancel the add operation and discard any changes made select the Cancel button.
Viewing an existing payment will load a popup with all its currently saved details. These details include: its Customer, Amount and Invoice allocations. To load this view page click the view button next to an existing payment.
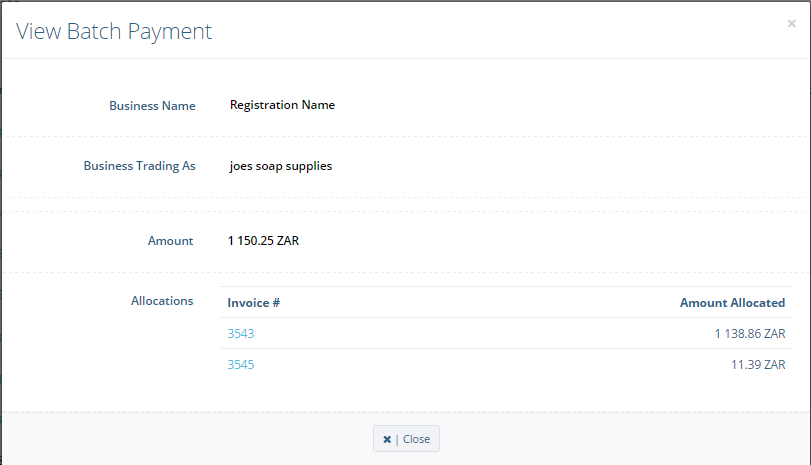
View Batch Payment
To edit an existing Payment, select the edit button next to an existing Payment on the Batch’s view page. You can edit the payment’s Payment Method, amount and Invoice allocations. Once you are happy with the details of the new payment being add you can save it to the save by clicking the Save button at the bottom of the popup. This will save the Payment to the batch and close the popup. Alternatively, to cancel the add operation and discard any changes made select the Cancel button
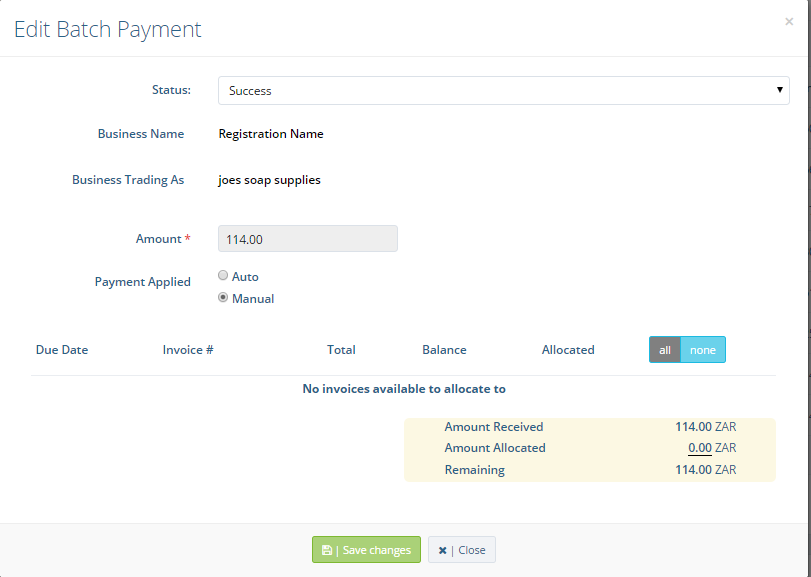
Edit Batch Payment
Payments can be deleted by selecting a delete button next to an existing payment on the view page of a Batch. After confirming the delete, the payment will be removed from the Batch and the allocations to Invoices will be removed.
Batches Overview
The Batches Overview page from where you can View and Add Batches.
Create Batch
Batches can manually added from the Create Batches page, these above details will be required to be entered.
View Batch
From the view of a Batch all its currently registered details will be displayed as well as its payments. Payments can be added, edited, view and deleted via the Payments table to the bottom.
Submit Batch
All Batches need to be manually submitted and will require you to enter your password.
Batch Edit
The Submit date, Action Date and any Notes relating to an existing Batch may be changed as neccesary from its edit page.
Batch Payments Overview
The Payments table to the bottom of a Batch's view page will display all payments registered to it and allow you to add, edit, view and delete these payments.
Add Batch Payment
Payments can be added to an existing Batch from it view page, these details need to be specified when doing so.
View Batch Payment
When viewing an existing Batch Payment from the view of the Batch it is registered to, all details relating to it as well as the invoices it is allocated to will be displayed.
Edit Batch Payment
On its edit page, the Payment Method, Amount and allocations of an existing Batch Pay.