- Customers
- Customer View
- Subscriptions
- Invoices
- Payments
- Manual Payments
- Live Payments
- Payment Methods
- Customer Contacts
- Customer Notes
- Batches
- Early Admin
- Early Invoice
- Early Batches
- Adjustments
- eMandate
Documentation
Getting Started
Manage
Payments
In Bill Again, Payments relate to all transactions made by your Customers to settle Invoices sent to them. These payments will therefore influence Customers’ balances owed to you as well as outstanding Payments on Invoices. Bill Again supports Payments in the form of HPP payments, Debit orders, Credit Card payments and Batch payments. The form of payments and what methods can be used when will depend on the Gateways you have set up and assigned to specific Customers, Gateways will be discussed in more detailed in its own section within this guide.
The Payments section and all its functions can be accessed from either the Payments page reached by selecting Payments from the left hand main Menu or from a Customer's view page.
Payments can be one of three types, namely: Automatic Payments, Manual Payments and Live Payments. Automatic payments relate to Payments automatically registered to the system for Customers set up to have their Payments go off automatically on their Invoices’ due dates or Payments done through your Customer Portal as well as emailed payment links. Manual Payments relate to Payments processed outside of the Bill Again system, these Payments can be registered and accounted for as Manual payments within the system. Lastly, Live Payments are Payments done and processed from the Admin side of the System by the Customer.
Please not that this section will serve as a general introduction to Payments as well as Automatic Payments. Live Payments and Manual Payments will be discussed in detail on their own sections within this guide.
Payments Overview
This area of Bill Again is accessed by way of the left-hand main menu, specifically by clicking Payments. This brings the user to a table formatted list of all the Payments currently logged in the system, as shown below:
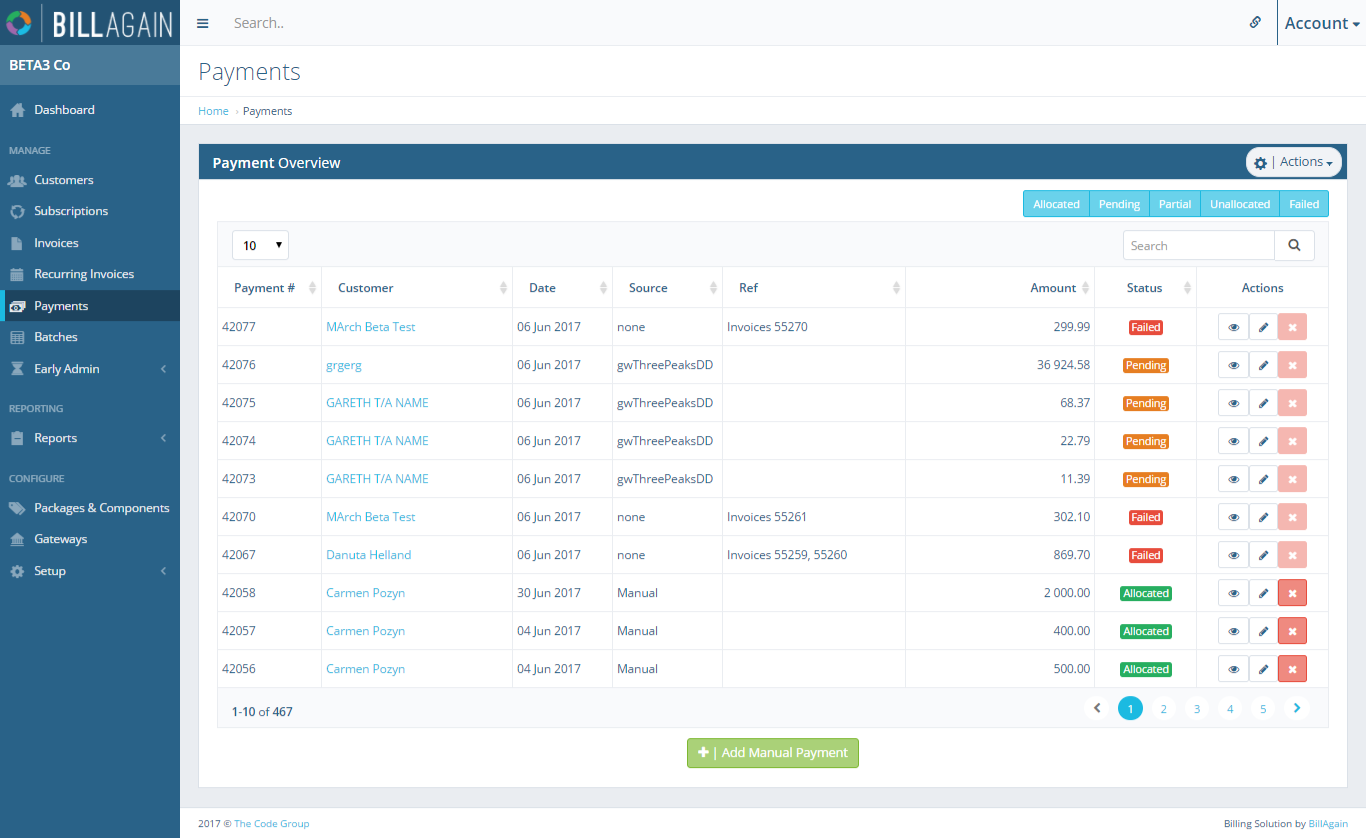
Payments Overview
The screen provides immediate, summary-based information for Payments and gives the user the following options for single, specific Payments:
- Viewing an existing Payment
- Editing an existing Payment
- Deleting an existing Payment
- Adding a Manual Payment
The fields displayed on this screen are explained briefly below:
- Payment number- Automatically assigned unique numbers used to identify individual Payments by
- Customer- To which Payment relates
- Date
- Source- Payment type
- Reference
- Amount
- Status
- Action
Status
Payments take on one of the following states:
- Unallocated: The payment has been created but not allocated to any specific invoice / invoices
- Partial: The payment has been created and allocated to an invoice / invoices but there still remains a portion of the payment that is not allocated to any invoice / invoices
- Allocated: The payment has been created and fully allocated to an invoice / invoices for the entire amount
- Pending: Payments that are registered but have not been processes yet or the transaction has not gone through, e.g. Batch Payments waiting to be submitted
- Failed: The payment has been created, but failed.
View Payment
This page can be navigated to by clicking on the View button in the actions column of any specific Payment, on the payment overview page or the customer overview page. It contains a summary of the payment information as well as a list of invoices which the payment has been allocated to, with a total at the bottom of the list.
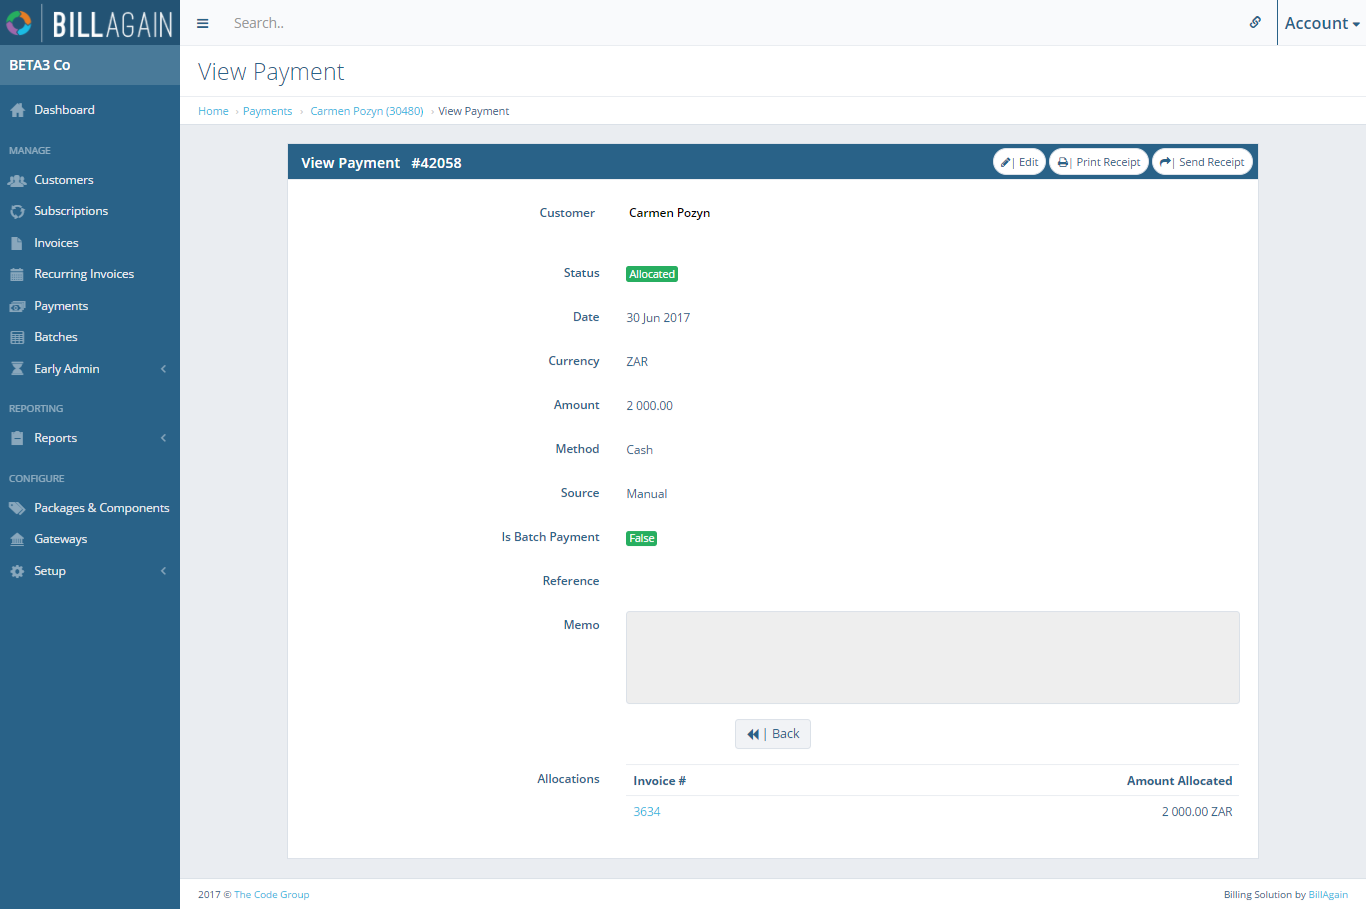
View Payment
The page will display the following details of the selected payment:
- Status
- Date
- Currency
- Amount
- Method
- Source/Type
- Batch Payment
- Reference
- Memo
- A list of Invoices to which the payment has been allocated to if applicable
- If the customer is a business, the business name and trading as name will also be displayed.
The view page also contains an edit button on the top right from which the selected Payment’s edit page can be reached. To return to the Customer overview page or the selected Customer’s view page, depending where you navigated from, select the back button on the bottom of the page
Edit Payment
This page can be navigated to by clicking on the Edit button in the actions column of any specific Payment, within the Payment overview page or a Customer's view page.
It contains a form with the existing payment information pre populated, information that can be edited will be editable within this page. In the case or automatic payments, only allocations and memos are editable, the rest of the fields become read only.
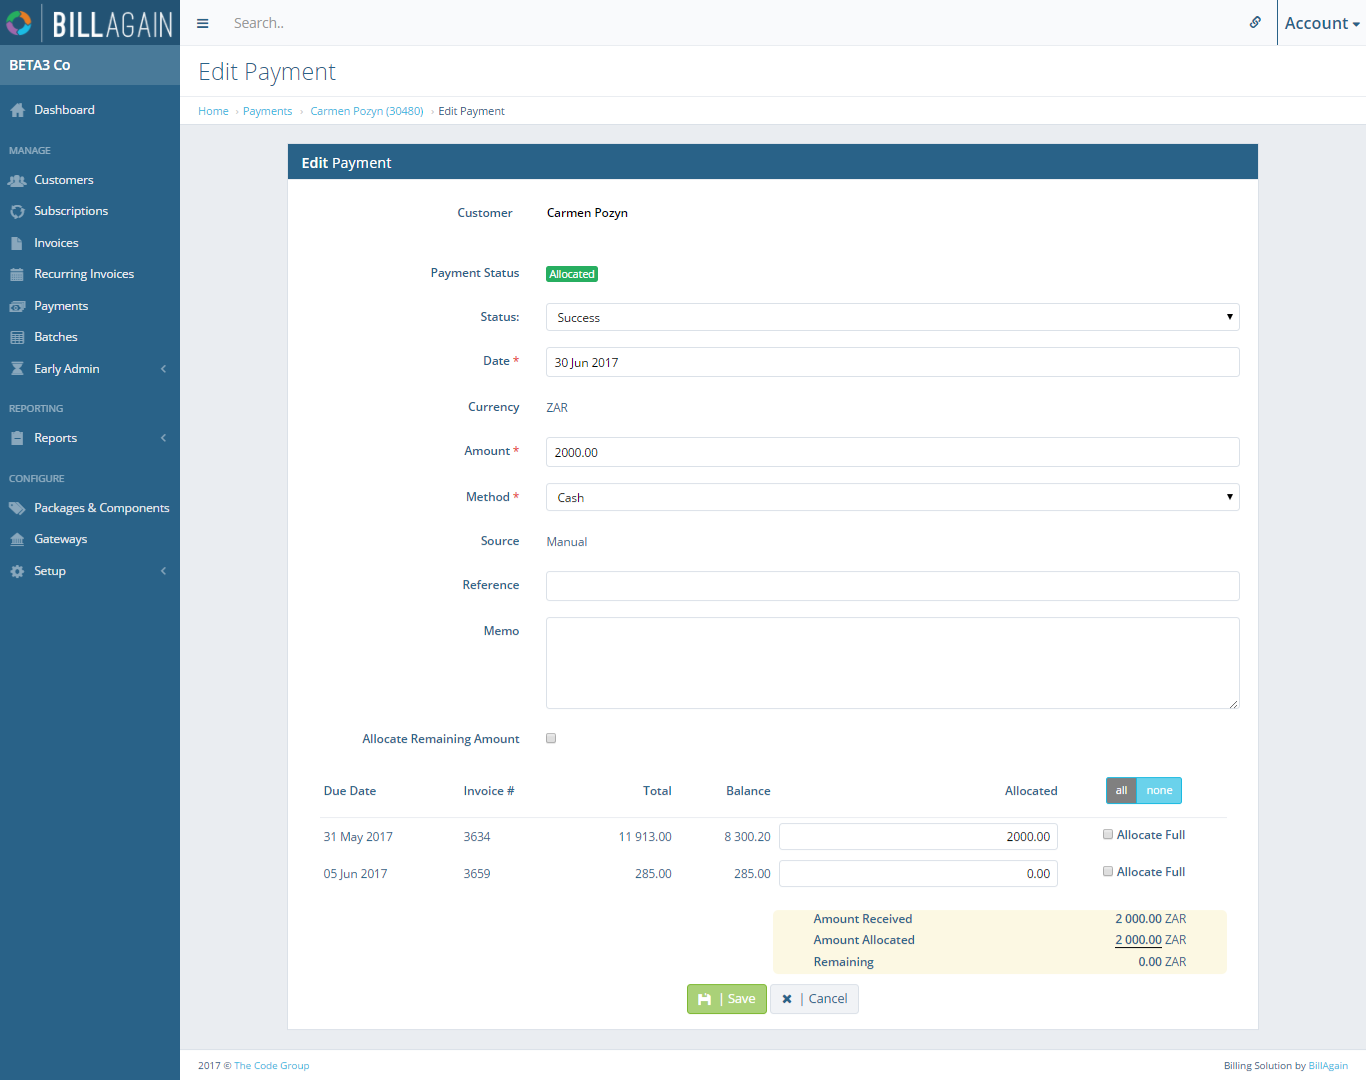
Edit Payment
Required fields are marked with a red asterisk and the save will not be performed if these fields are not filled in and valid. Currency is not editable and appears for informational purposes, the currency that appears here is the customers default currency. The amount of the Payment has to be greater than zero.
The table at the bottom is the allocations table, it is made up of Invoices that can be allocated to. For Invoices that have already been allocated to from the selected Payment, the allocated values will be prepopulated in the allocated box. Clicking “all” in the last column heading will result in all allocated values to be populated, the values being the amounts outstanding. Ticking the “Allocate Full” checkbox will result in that rows allocated value to be populated with the outstanding amount.
The allocated value for the invoice has to be less than or equal to the sum of the existing allocation and the invoice balance. The summary box underneath the allocations table contains three summary values:
- Amount Received: The total amount of the Payment
- Amount Allocated: The total of Invoice allocations
- Remaining: The amount of the Payment that can still be allocated, if amount is negative and has a red text colour then then you have over allocated and may not save until this is fixed
When the save button is selected the fields on the page undergo validation and error messages and red boxes will be displayed to indicate errors on the page, if all fields are entered appropriately the system will save the changes made and redirect to the selected Customer's page, if there are errors they will have to be fixed before a save will be successful. Selecting the cancel button will discard any changes made redirect the user to the Customer's view page.
Delete
Payments can be deleted by clicking the delete button next an existing Payment from the Payments Overview or Customer View pages. Upon clicking the delete button a confirmation box will come up, on clicking “OK” the payment and allocations of the payment will be deleted, resulting in an increase in the customer’s outstanding balance. For payments that were performed automatically or through external payment gateways the delete button is disabled as it is not possible to delete those.
Payments Overview
The Payments Overview page from where you can Add, Edit, View and Delete Customer Payments.
View Payment
Viewing a Customer Payment will display all the details relating to it allow to edit, print or send a receipt for it.
Edit Payment
Details such as dates, amount, method, refference and allocations relating to registered Customer Payment can be changed as neccesary.