- Customers
- Customer View
- Subscriptions
- Invoices
- Payments
- Manual Payments
- Live Payments
- Payment Methods
- Customer Contacts
- Customer Notes
- Batches
- Early Admin
- Early Invoice
- Early Batches
- Adjustments
- eMandate
Documentation
Getting Started
Manage
Gateways
Gateways are external processors of payments used to process payments received and made by Customers. You will need to register with at least one of the Gateways supported by Bill Again in order to receive and process payments through Bill Again.
Once set up, Gateways can be used to process the specific types of payments they support. Each Customer also gets a Gateway assigned to them with which all automatic payments will be processed as with which payments will be made with from their Customer login portal. This Gateway assigned to the Customer will therefore serve as the method used to receive all payments from them, with the exception of Manual Payments and Live Payments. For Live Payments any Gateway and payment method may be used for payments, provided the Customer has appropriate Payment Methods set up for it. Manual Payments on the other hand relate to Payments made outside of the Bill Again system and are therefore independent of Gateways.
Please note that you will only be able to process specific type of payments if you have the appropriate Gateway set up for the type. Also note that the type of payments automatically processed for Individual Customers will be directly linked to the Gateway assigned to them.
Gateway Overview
This area of Bill Again is accessed by way of the left-hand main menu, specifically by clicking Gateways. This brings the user to a table formatted list of all the Gateways currently registered to your account, as shown below:
This screen provides immediate, summary-based information for Gateways as well as giving the user the following options for single, specific Gateways:
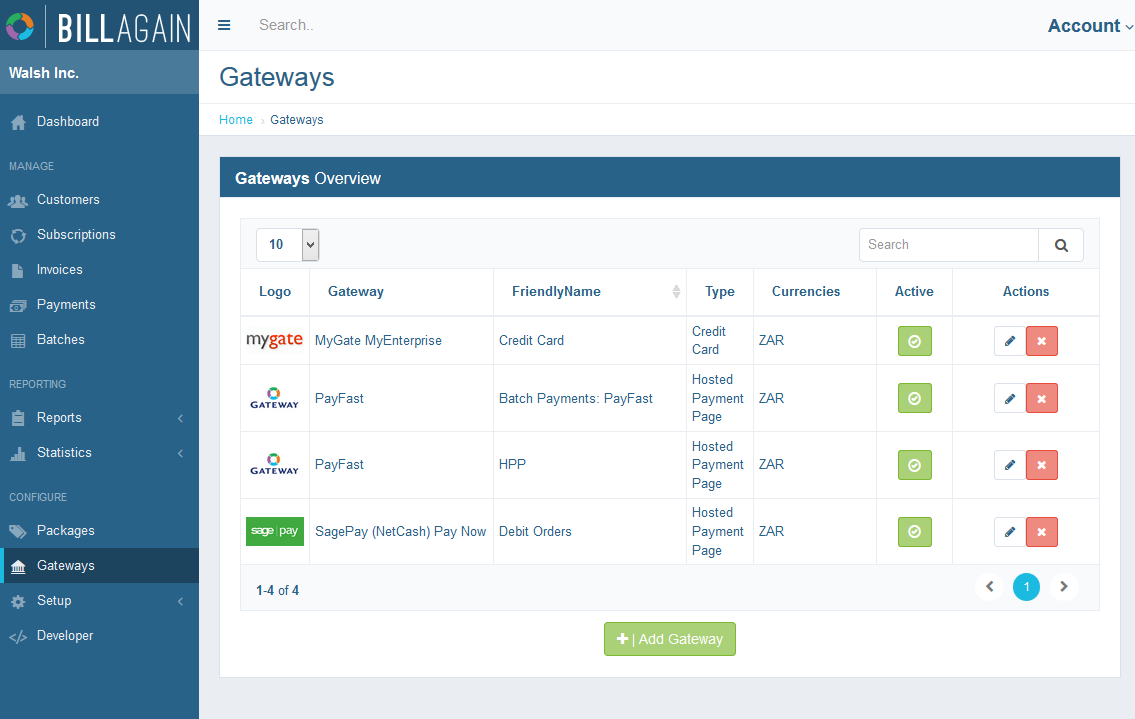
Gateways Overview
- Adding a new Gateway
- Editing an existing Gateway
- Deleting an existing Gateway
- Setting a Gateway as inactive or active
The fields displayed for each Gateway are explained briefly below
- The Gateway company’s logo
- The Gateways official name
- A Friendly name set by you
- The Gateway’s type
- Currency
- Active status
Gateway Types
Different Gateways support the processing of different Payment types support by Bill Again. The Gateway types include:
- Hosted Payment Pages: Gateways that require payers to be redirected to the gateway's own secure hosted page where the payment details are entered and payment is made, after payment is complete the payers are redirected back to BillAgain
- Credit Card Direct: Gateways that allow payments to be processed in real time without redirection to an external page, either using a secure internally hosted page for card present transactions or as an automated card not present transaction.
- Credit Card Batching: Gateways that allow not real time processing of credit card transactions and with multiple payments batched together and processed at one time at a deferred point in time
Please note that some Gateways provide all or some of these features, generally as separate applications. Certain Gateways allow mixed Batches, i.e. both Credit Card and Debit order batching together. These are all Gateway dependent.
A default bank account Gateway and a default Credit Card Gateway can be set per each account Currency, these are mostly used and more important for Bill Again’s automated collection services.
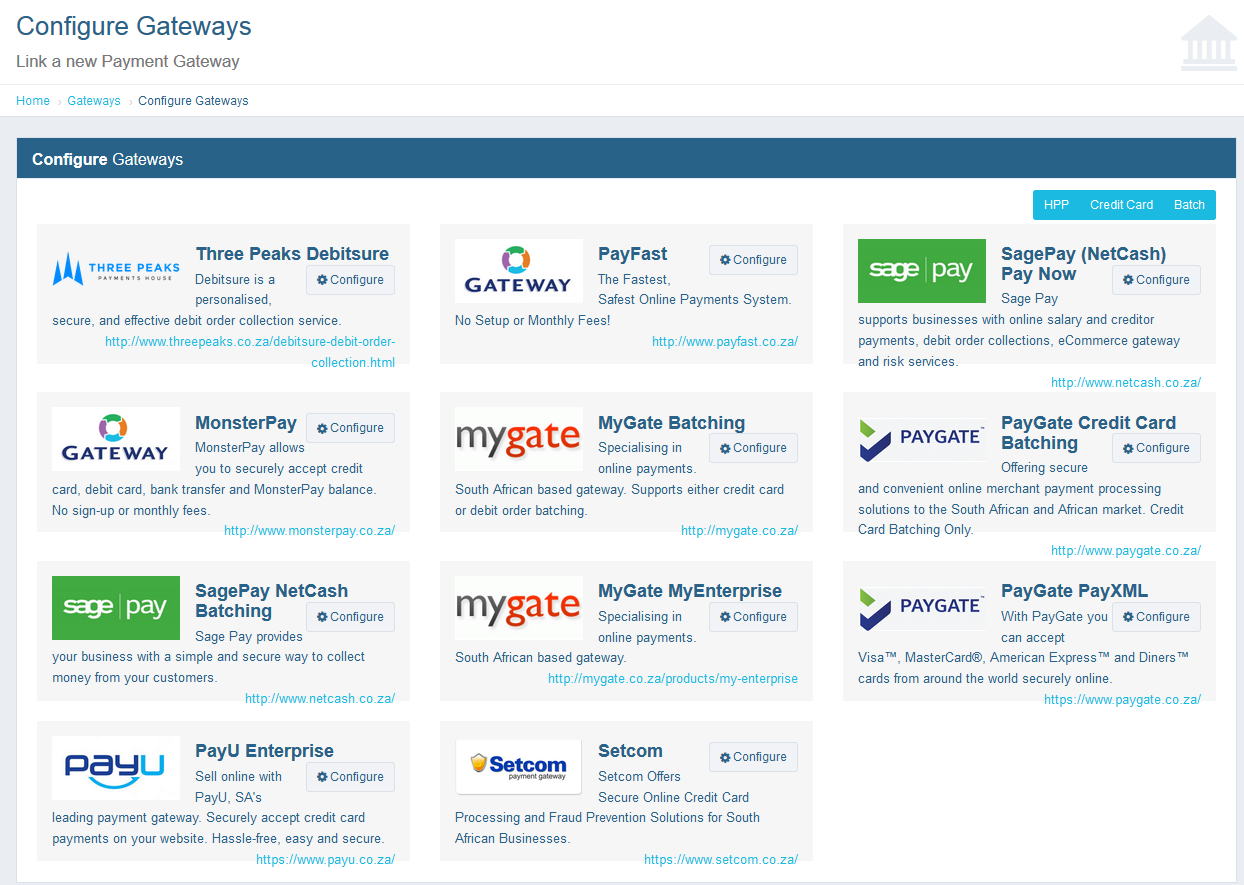
Adding a Gateway
Before a Gateway is set up you will have to register for the specific desired service type of that Gateway. To add a new Gateway select the Add Gateway button at the bottom of the Gateways Overview page. Once selected, the Configure Gateways page will be loaded from which a new Gateway can be configured. Each Gateway has a customized Gateway setup page which can be accessed by selecting the “Configure” button next to the Gateway you wish to add. On clicking configure the appropriate gateway setup page will be opened.
Add Gateway Step 1
On the gateway setup page you will see that the first item is always a friendly name field, this is a name chosen by you in order for you to easily identify the gateway when it is being used. The second field is a tick box to indicate whether you are using the gateway for live or testing purposes, if testing purposes then you will have to get test credentials from the gateway.
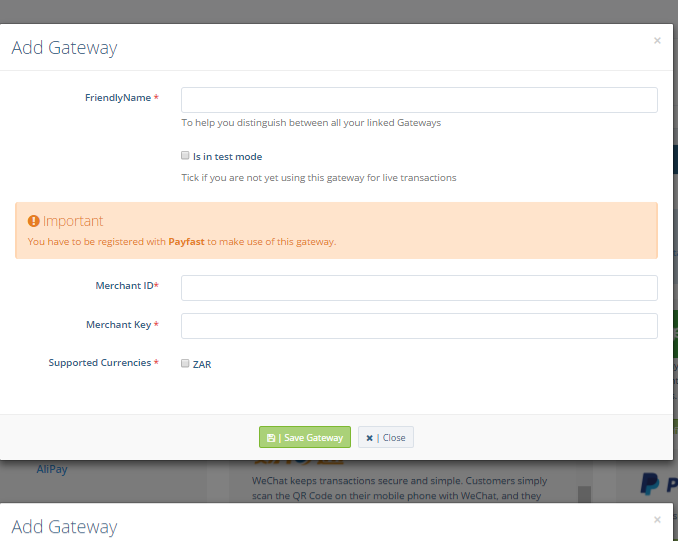
Add Gateway Step 2
The rest of the fields will be gateway specific and you will have to be registered with the gateway in order to have those details. The last field is the choosing of currencies, this will load all currencies supported by the gateway, you will have to choose the currencies for which you have a valid merchant account. Once you are satisfied with the details specified, select the save button at the bottom of the page to save the new Gateway. Alternatively select the Cancel button to abort the adding operation and return to the Gateways Overview page.
Running Gateways in Test Mode
Bill Again gives you the option to run a Gateway in Test Mode to see how it operates and fits your needs before signing up for it externally. Running a Gateway will work exactly the same as in live mode, but will differ in that no actual money will be processed through it. To use a Gateway in Test Mode, simply select the "Run in Test Mode" option when adding or editing it. While in test mode, the Gateway will also not require valid credentials recieved after signing up for it from the Gateway.
The idea behind Test Gateways is to use it with dummy data, including dummy Customers, to see if the Gateway fits your needs. If you are satisfied with it, you can sign up with the Gateway and configure it to your account to be used live and process real payments.
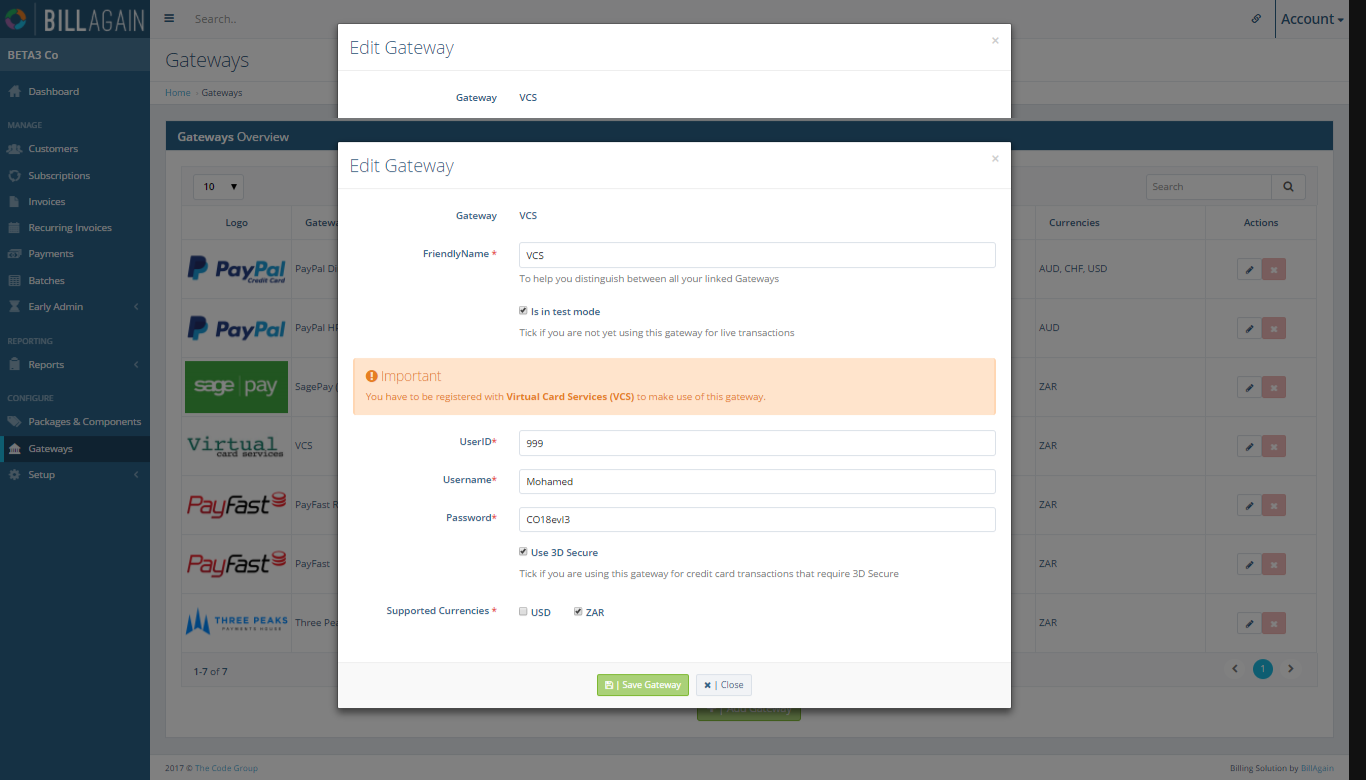
Editing a Gateway
Existing Gateways can be edited by selecting the edit button next to one displayed on the Gateways overview page. Selecting the edit button will redirect you to the Edit Gateway page from which you will be able to edit its Friendly name, whether it is in test Mode, its Gateway as well as Gateway specific information relating to your registration to the Gateway in question.
Once you are satisfied with the changes, select the Save button at the bottom of the page to save the changes made. Alternatively select the Cancel button at the bottom to discard any changes made and return to the Gateway overview page.
Edit Gateway
Changing the Active Status
If you whish to temporarily remove support for a specific Gateway registered to your Account, you may do so from the Gateway Overview page. To change a Gateway to inactive, select the green button in the “Active” table heading. This will change the icon to red and make the icon inactive. Alternatively, you can reactivate an inactive Gateway that has a red icon by selecting it which will change it to green again and set the Gateway to active
Please note that once you have set a Gateway to inactive, Customers will not be able to make payments using it which will result in failed payments and some Customers not being able to settle their Invoices.
Deleting a Gateway
If needed, a Gateway can be permanently removed from you Bill Again account by deleting it from your system. To delete a Gateway simply select the delete button next to an existing Gateway on the Gateway Overview page. Once selected, you will be asked to confirm your delete. Clicking the “Yes” button will confirm the delete and the Gateway will be removed from your Bill Again account. Alternatively, if you select the “No” button the delete operation will be cancelled and the Gateway will remain on the system.
Please note that if a Gateway is deleted, Customers will not be able to make payments using it which will result in failed payments and some Customers not being able to settle their Invoices.
Gateways Overview
The Gateway Overview page from where you can Add, Edit, Delete and View Gateways.
Add Gateway
The first step of adding a Gateway relates to selecting a thrid party Gateway to register to your Bill Again account.
Add Gateway
The second step of adding a Gateway requires you to enter your specific details of the Gateway.
Edit Gateway
The Edit Gateaway page allows you to change any details of a registered Gateway.