- Customers
- Customer View
- Subscriptions
- Invoices
- Payments
- Manual Payments
- Live Payments
- Payment Methods
- Customer Contacts
- Customer Notes
- Batches
- Early Admin
- Early Invoice
- Early Batches
- Adjustments
- eMandate
Documentation
Getting Started
Manage
Manual Payments
In addition to the processing and registering payments within the system, Bill Again also caters for the registration of Payments not processed through it. These Payments relate to those done by Customers through means not linked to Bill Again but apply to settling a Customer’s Invoices. It is therefore a method of taking into account payments made by a customer to you outside of Bill Again,
Manual Payments will have the same implications as any other payment within Bill Again and will also be displayed with these other Payments on the same pages. Manual Payment entries will however be distinguishable on these pages through their source field which would be: “Manual”. Manual Payments will appear, be maintainable and add-able from the Payments Overview Page and Transaction table on a Customer's view page. The Payments Overview page can be reached by selecting Payments from the left hand main menu and a Customer’s view page can be reached by selecting the view button next to an existing Customer from the Customer overview page.
These overview pages, other payment types and the general manipulation and implications of Payments are discussed in more detail in the Payments section of this guide. This section will focus specifically on the functioning a maintenance of Manual payments.
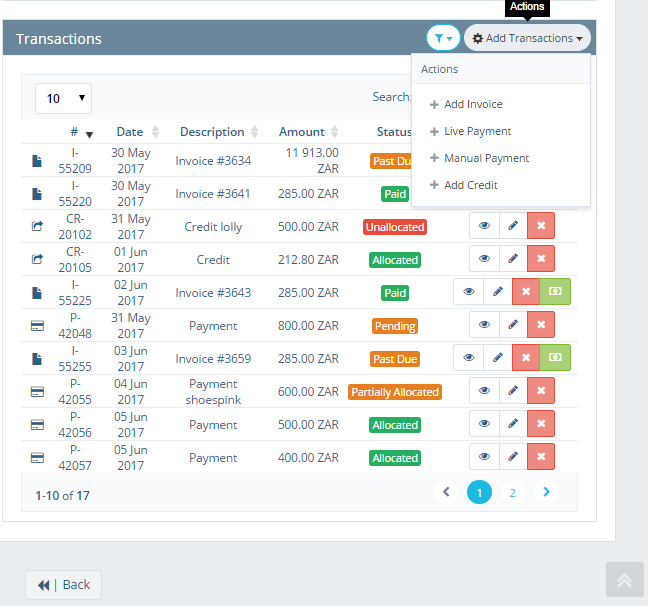
Payments and Credits table
Manual Payment Methods
Manual payments can be done using the following methods (All external to Bill Again):
- ACH: Automated Clearing House (ACH) is an electronic network for financial transactions in the United States
- Cash: Amounts paid using hard cash
- Cheque: Amounts paid using a cheque (or check)
- Credit Card: Amounts paid using credit card
- Debit Order: Amounts paid by a debit order
- EFT: A transfer from customers bank account to your account
- SEPA: Single Euro Payments Area for European Union countries
- Other: Any other unlisted payment method
Please note that these Payment methods are external to the BillAgain system and are just there for your information and for adding them to Customer balances, no delete or edit restrictions therefore apply to manual payments. A credit card chosen payment method for example is not the same as a Bill Again processed credit card transaction therefor the deletion restriction will not apply to a Manual Payment with type credit card.
The payment source for Manual Payments will always be “Manual” and will be the Gateway code for automatic transactions.
Adding Manual Payments
The Add Manual Payment from which Manual Payments are added can be reached by either clicking the Add Manual Payment button on the Payments Overview page or by selecting the Add Manual Payment from the Customer view page.
Selecting the Add Manual button from the Payments Overview page will require you to search for a specific Customer in your account by typing in part of the Customer's name or code, selecting the intended Customer from the drop down results and clicking the Go button. This will redirect you to the Add Manual Payment page. If the cancel button next to the Go button is selected the text box will disappear. Alternatively, selecting the Add Manual Payment from the Customer View page will automatically pick up that the new Manual Payment is to be added to the Customer which was viewed.
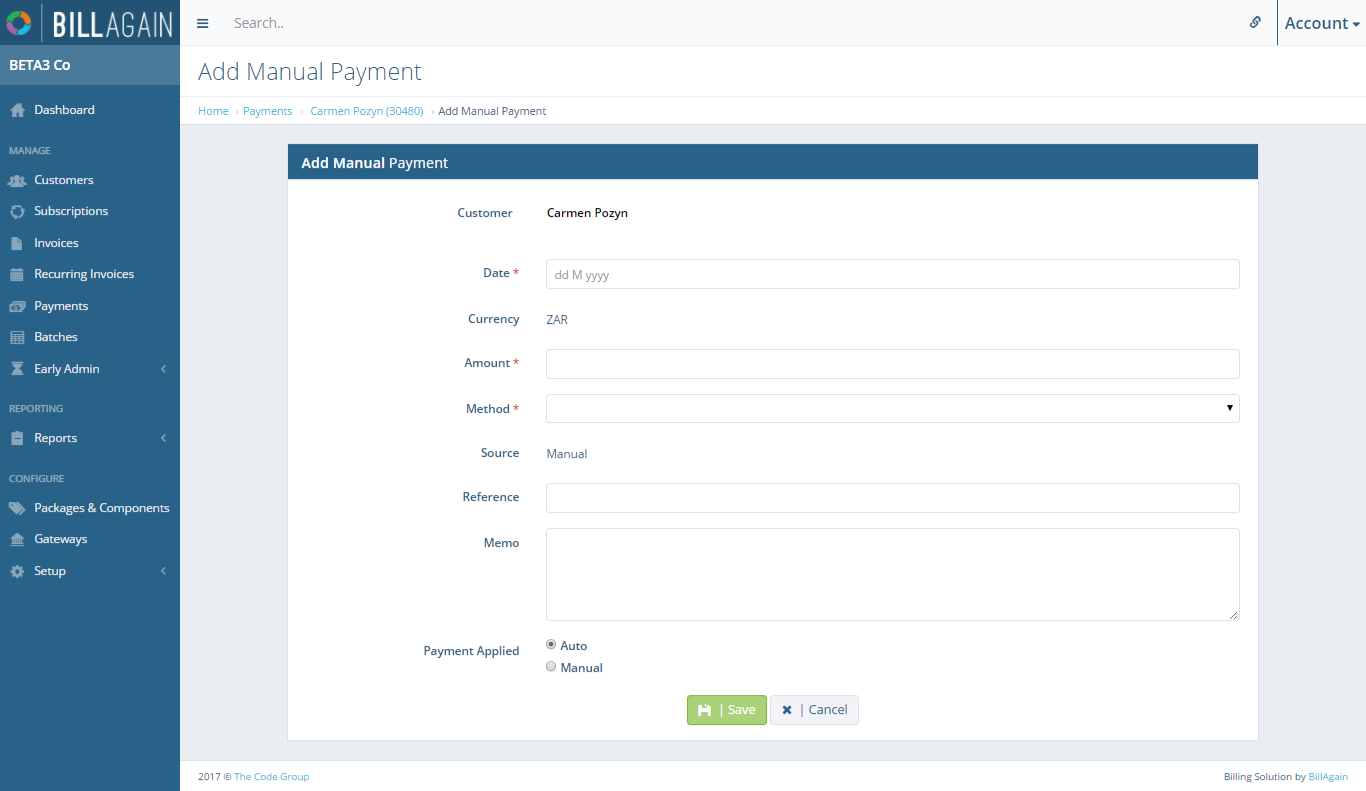
Add Manual Payment
Once the Add Manual Payment page has been reached you will see that it contains a blank form with only informational read only values populated. Required fields are marked with a red asterisk and the save will not be performed if these fields are not filled in and valid. The Currency field is not editable and only appears for informational purposes as the currency that appears here is the Customer's default currency.
The amount of the Payment has to be greater than zero and the Payment source for Manual Payments will always be “Manual” and will be the Gateway code for automatic transactions. The reference is a way of identifying the transaction, which could be a bank reference or something similar. The memo can contain any notes related to the payment.
The table at the bottom is the allocations table, it is made up of invoices that can be allocated to. Clicking “all” in the last column heading will result in all allocated values to be populated, the values being the amounts outstanding. Ticking the “Allocate Full” checkbox will result in that rows allocated value to be populated with the outstanding amount. The allocated value for the Invoice has to be less than or equal to the Invoice balance.
- Amount Received: The total amount of the Payment
- Amount Allocated: The total of Invoice allocations
- Remaining: The amount of the payment that can still be allocated, if amount is negative and has a red text colour then then you have over allocated and may not save until this is fixed
When the save button is selected the fields on the page undergo validation and error messages and red boxes will be displayed to indicate errors on the page, if no errors are found the system wil save the payment redirect you to the Customer's view page. If errors were picked up they will have to be fixed before a save will be successful. The cancel button will result in any changes made being discarded and the selected Customer's view page being loaded.
Payments Overview
The Payments and Credits table on Customer View displays all the Payments and Credits registered to a Customer, including Manual Payments.
Add Manual Payment
Payments done outside of Bill Again can be registered to the system and applied to specific invoices manually or automatically.