- Customers
- Customer View
- Subscriptions
- Invoices
- Payments
- Manual Payments
- Live Payments
- Payment Methods
- Customer Contacts
- Customer Notes
- Batches
- Early Admin
- Early Invoice
- Early Batches
- Adjustments
- eMandate
Documentation
Getting Started
Manage
Invoices
Invoices in Bill Again are issued to Customers as notifications of payments due, primarily containing a list of items purchased, the tax on those items and the final cost to customer as well as the Customer and their company's details. Invoice sections can be accessed from two different places in Bill Again, one being from the left-hand main menu, and the other from the Customer Overview screen (although these invoices are related to the Customer in question).
Invoices Overview
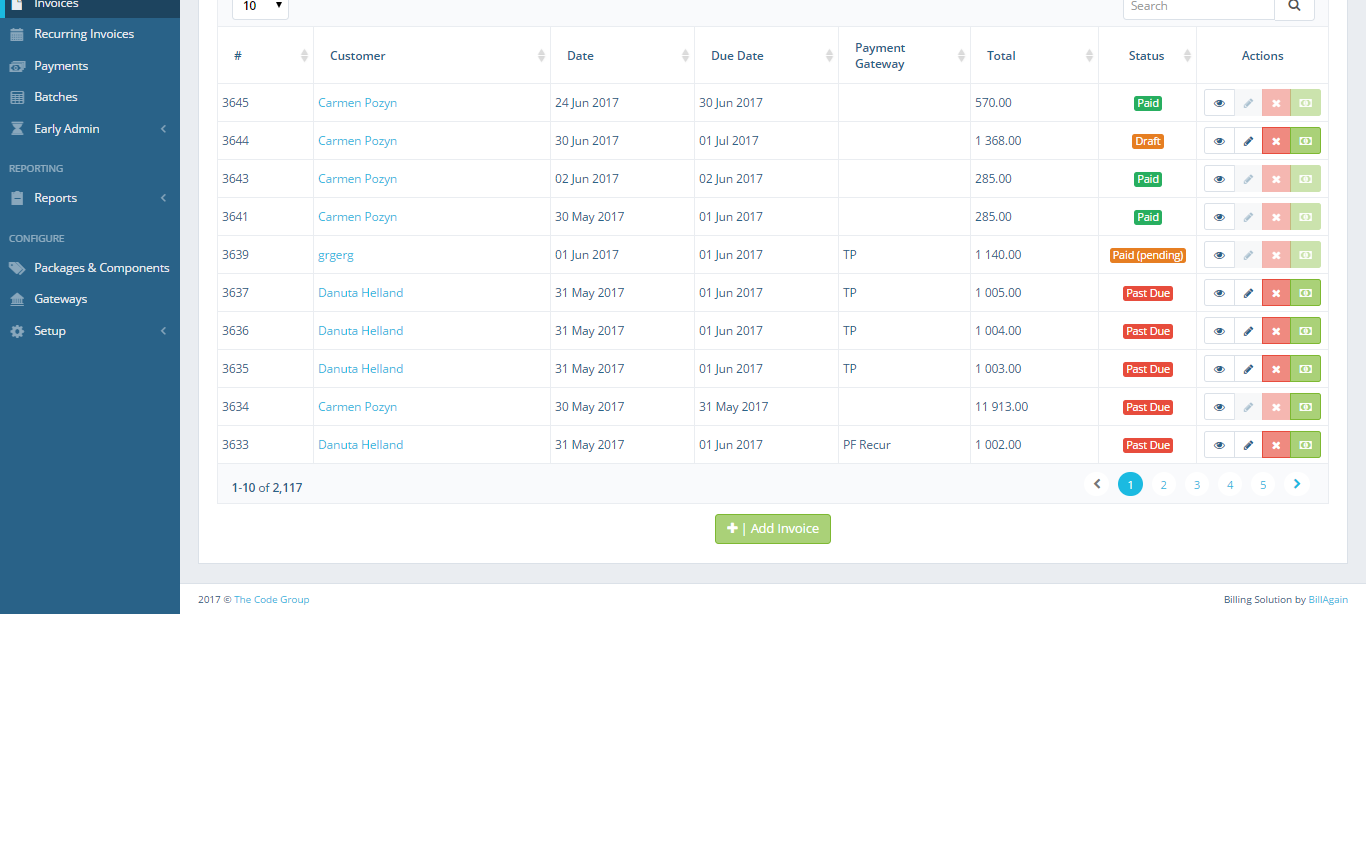
This area of Bill Again is accessed by way of the left-hand main menu, specifically by clicking Invoices. This brings the user to a table formatted list of all the invoices currently logged in the system, as shown below:

Invoices Overview
This screen provides immediate, summary-based information for Invoices as well as giving the user the following options for single, specific Invoices:
- Viewing an Invoice
- Adding a new Invoice
- Editing an existing Draft Invoice
- Deleting an Invoice
- Change Payment Details
The fields on this screen are explained briefly below:
- # - The Invoice number
- Customer – The Customer to which the Invoice is assigned
- Method – Whether the Invoice was generated manually or automatically by the system
- Date – The date the Invoice was created
- Due Date – the date by which the Invoice needs to be paid
- Payment Gateway
- Total – The total outstanding amount owing for that Invoice
- Status – The current status of the invoice. Statuses will be detailed in an Invoice Statuses subsection
- Actions – The available actions performable by the user (View, Edit, Delete, Change Payments)
- Bulk Interface- Enables you to perform actions to a number of selected invoices
- Advance Filter- Provides you with more control
Viewing an Invoice
When the View Invoice button is clicked in the corresponding Invoice row, the virtual representation of that Invoice will be displayed, as shown here:
View Invoice
The invoice contains information regarding the physical address, telephone number and email address of both the Customer receiving the Invoice as well as the company issuing it. Other customer/company information includes:
- The Invoice Number
- The Purchase Order number (PO Number)
- The date the Invoice was created
- The date the payments for this invoice are due (due date)
- The Status of the Invoice
The main section of the Invoice is a Charges table detailing the items to be paid for, their cost, any applicable tax charges and the applicable totals. For each item charged for, the table will display a row with:
- The Name of the item
- The item's Description, describing what the item is or does
- The Quantity(QTY) of the item, listing how many of the item the Customer is being charged for
- The Unit Price, which is the cost of each ONE unit of the item
- And the Total, summing up the cost for all items in that row
Below the item rows, the Subtotal is displayed, which is sum of all the charged items. This value excludes any taxation costs. The taxation costs are then displayed individually in rows, with each row showing the type of tax, its percentage value and the actual calculated amount (the percentage value calculated against the Subtotal) for that individual tax charge. After the listing of taxation rows, the final total is displayed. This number is the ultimate amount owed by the customer, and is fully inclusive of any and all charges.
Beneath the Charges table the Terms and Notes are displayed. These are unique to the customer in question and are not different for each Invoice. These are better described in the glossary.
On the top of the invoice a Action Button will be available. The available options are explained here:
- Print – Opens a printer-friendly Invoice report in a new window
- Send – Send the Invoice to the related Customer via email
- Edit – Will redirect to the Edit Invoice screen (see subsection “Editing an existing Draft Invoice”). Only available if Invoice is in the Draft State
- Edit Payment Method -The credit card or bank account that will be used to pay for the invoice
- Cancel – Cancels the adding process and discards any changes made
Adding a new Invoice
An Invoice can be added from the Invoice Overview screen via a button at the bottom of the table, labelled “Add Invoice”. Upon clicking this button a Customer to whom the Invoice will be addressed must be searched for, selected, and the Go button clicked. Alternatively, clicking the Cancel button (signified by a red X) will cancel the new Invoice process.
Once a customer has successfully been selected and the Go button clicked, the user will be redirected to the Add New Invoice screen. This screen is visually almost identical to the View Invoice screen in both structure and data represented. Most fields are editable with a few being required, namely the Invoice Date and Invoice Due Date, Collection Method as well as at least one item in the charges table. PO Number field represents the Purchase Order Number and is optional.
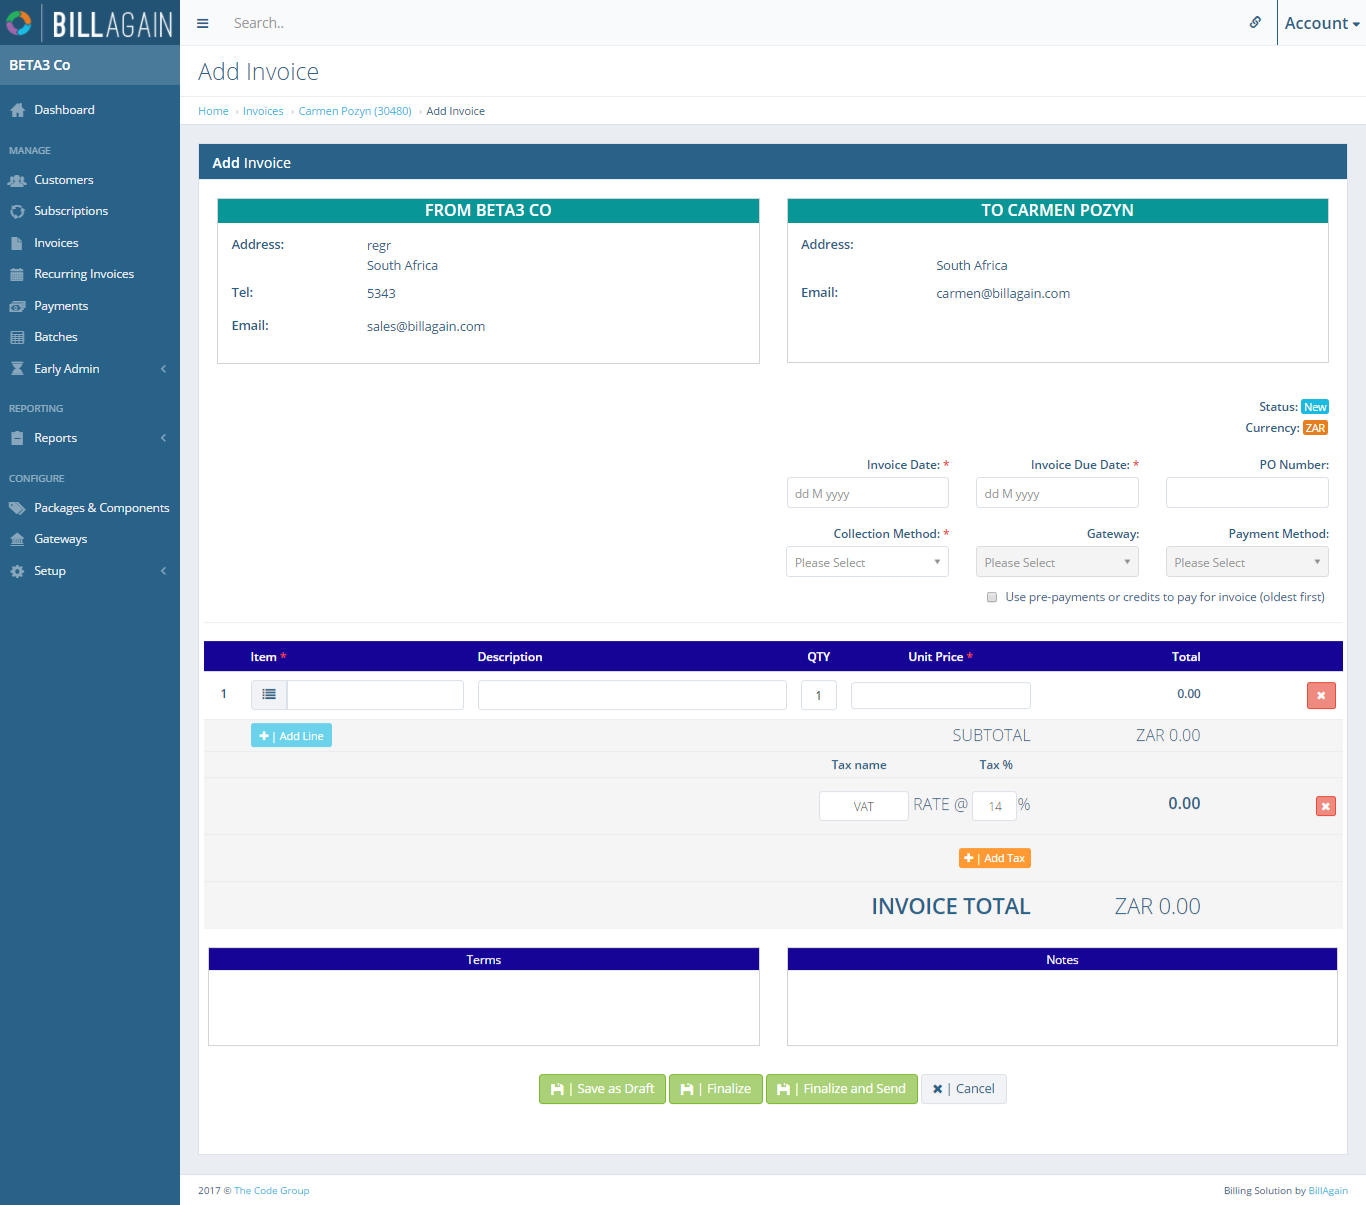
Add Invoice
Further options are available through these checkboxes:
- Auto collect Invoice – Customers will automatically be debited for this Invoice
- Allow customer payments from site – enables the customer to pay this Invoice through the online payment facilities within Bill Again
Both options are enabled by default.
The addresses, telephone numbers and email addresses are automatically generated for the Customer in question.
The Charges table is populated automatically with one empty row and manually for any additional rows by clicking the Add Line button. Fields for the table are filled out manually and Item Name and Unit Price are required fields. The total field (as well as the Subtotal of all rows) is calculated automatically based on the unit price and quantity. Rows may be repositioned within the table or deleted with the action buttons on the far right-hand side of the row (next to the total).
Taxes charges can be added then to the Subtotal of the Charges table by the same means as adding an Item Line, but instead of clicking Add Line the user must click the Add Tax button, and then input the name of the tax and the percentage value rate at which it is charged.
The Charges table total is auto calculated on all of the above values.
Once the invoice has been filled out accordingly, the user may either:
- Save As Draft – Save the current Invoice as a draft to be edited later
- Save – Save and complete the Invoice. Once done the Invoice will not be able to be edited further. This sets the Invoice state to either pending or due, depending on the current date.
- Save and send – performs the Save function and then emails a copy to the Customer
- Cancel – Cancels the adding process and discards any changes made
Editing a Draft Invoice
The process of editing an Invoice is almost identical to adding a new invoice, but the invoice is loaded with any data previously entered upon its creation.
The Invoice Date and Invoice Due Date as well as at least one item in the charges table will be prepopulated as mentioned above and can be changed or expanded upon. PO Number field represents the Purchase Order Number and is optional. The addresses, telephone numbers and email addresses are automatically generated for the Company and Customer in question.
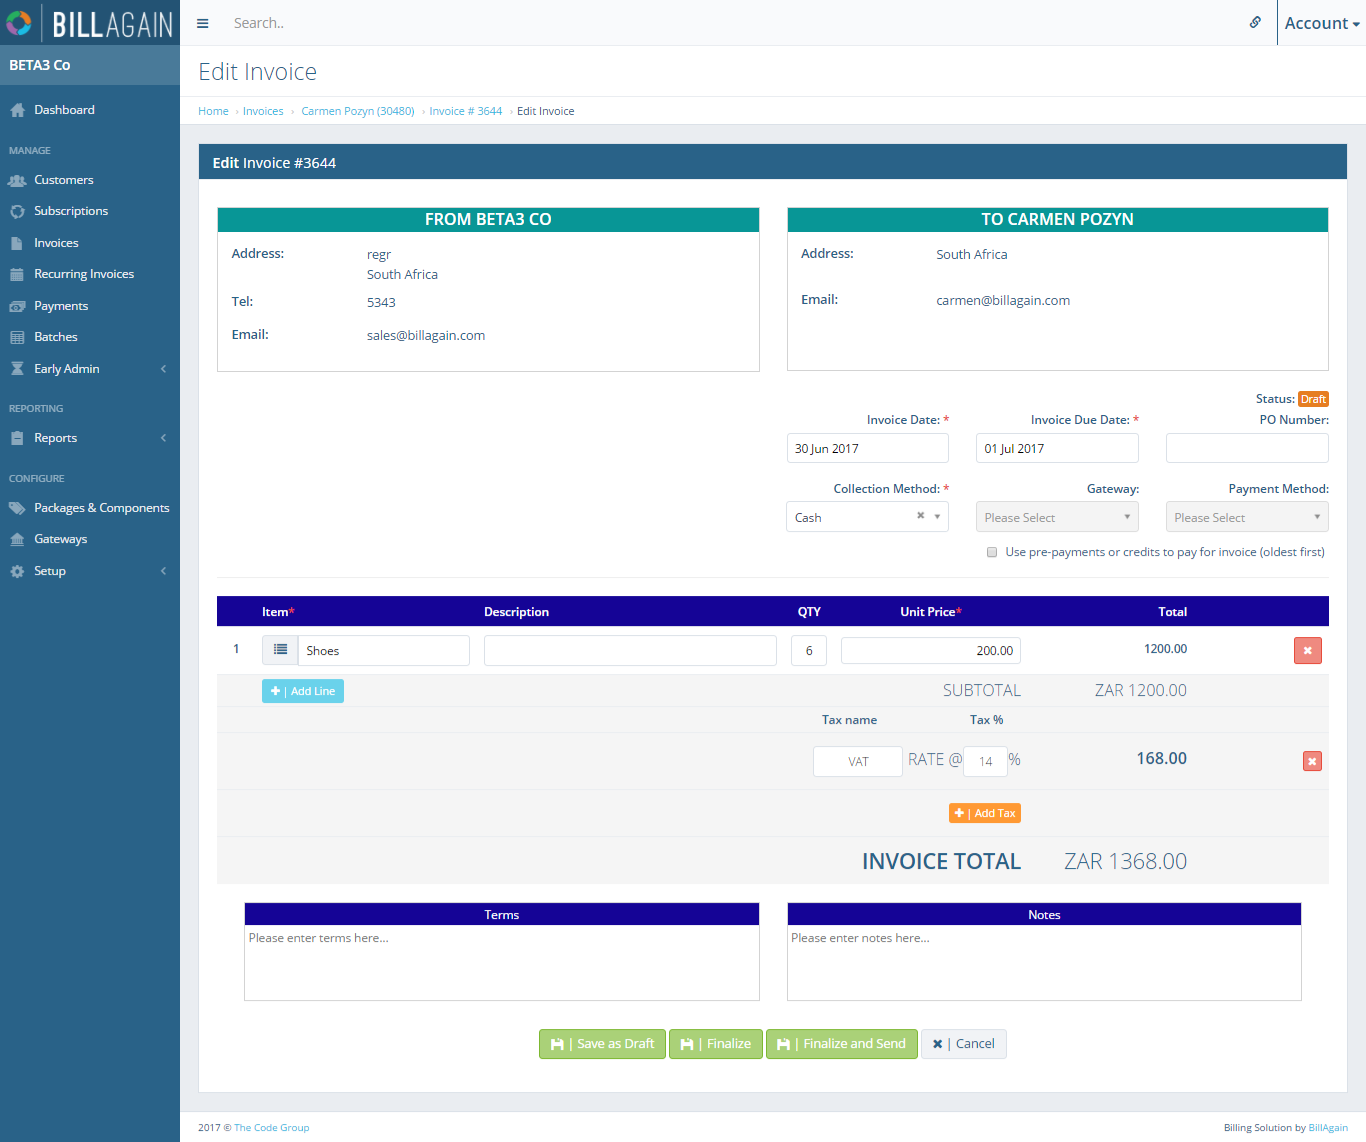
Edit Invoice
Further options are available through these checkboxes:
- Auto collect Invoice – Customers will automatically be debited for this Invoice
- Allow Customer payments from site – enables the Customer to pay this Invoice through the online payment facilities within Bill Again
Both options are enabled by default, unless set when the Invoice was created.
The Charges table is prepopulated any rows added when the Invoice was created and new rows can be manually added by clicking the Add Line button. Fields for the table are filled out manually and Item Name and Unit Price are required fields. The total field (as well as the Subtotal of all rows) is calculated automatically based on the unit price and quantity. Rows may be repositioned within the table or deleted with the action buttons on the far right-hand side of the row (next to the total).
Taxes charges can be added then to the Subtotal of the Charges table by the same means as adding an Item Line, but instead of clicking Add Line the user must click the Add Tax button, and then input the name of the tax and the percentage value rate at which it is charged.
The Charges table total is auto calculated on all of the above values.
Once all changes and additions have been made, the invoice can be saved with the Save button, or all changes can be cancelled with the Cancel button.
Deleting an Invoice
Only past due invoices may be deleted, and this can be done by either clicking the Delete button in the far right-hand side of the Invoice row, From the Invoice Overview screen.
Alternatively there is also a Delete button in the upper right corner of the Invoice View screen panel.
Status of an Invoice
An Invoice can have 6 different states, each determined by a set of factors regarding the Invoice in question. The states are:
- Draft – The Invoice has not yet been completed and requires further editing or review before being saved and essentially locked.
- Cancelled – The Invoice has been cancelled and is no longer in effect
- Paid – The customer has been debited for the amount owing and the balance has been settled
- Pending – The Invoice Date is further away than the current date. The Invoice has been created but is not yet in effect.
- Due – the Invoice is in effect and the customer is required to pay the balance before the Invoice Due Date.
- Past Due – The Invoice Due Date has been reached and the Customer is behind on the payment.
Invoice Overview
The Invoice Overview page from where you can Add, Edit, View and Delete invoices.
View Invoice
An existing Invoice's view will display all detailes to be sent to the Customer, from it the Invoice can also be printed, emailed or cancelled.
Add Invoice
Manual Invoices which relate to items outside of Subscriptions can be created and charged to these Customers.
Edit Invoice
Invoices saved as Draft can be changed as needed before being sent to Customers